💡 补档,回顾helm的入门使用相关笔记
1、什么是helm
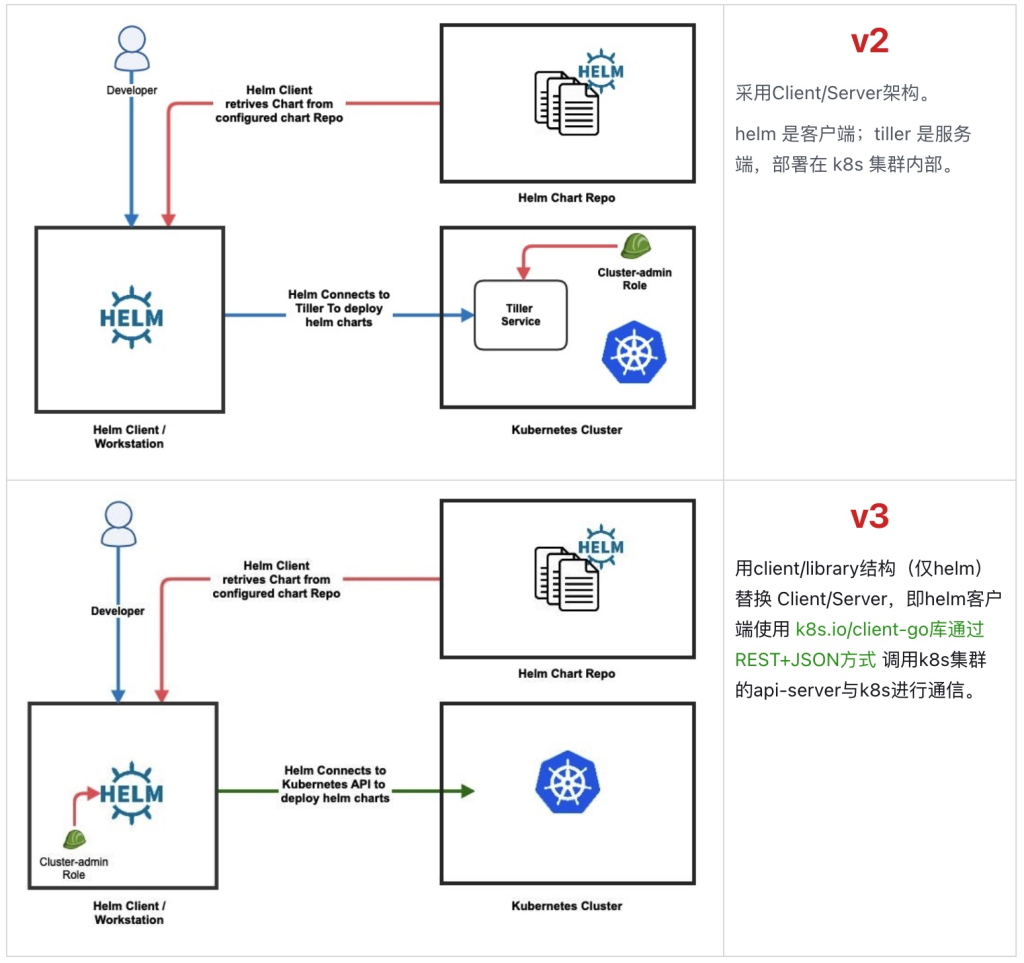
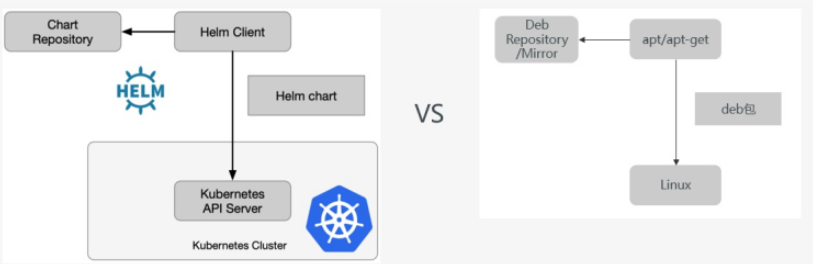
Helm是k8s的包管理工具,类似Linux系统常用的 apt、yum等包管理工具,使用helm可以简化k8s应用部署。
官网地址:https://helm.sh/
2、helm与apt对比
| 类别 | helm | apt |
|---|---|---|
| 安装包 | chart | deb |
| 仓库 | helm repository | apt repository/mirror |
| 操作系统 | kubernetes | linux distribution |
| 包依赖 | helm dependency | deb dependency |
| 包管理工具 | helm client | apt/apt – get/apt – cache |
elm和apt之间概念的对比,如果熟悉apt的也就能够很快的对helm有一个初步的认识。
3、基本概念
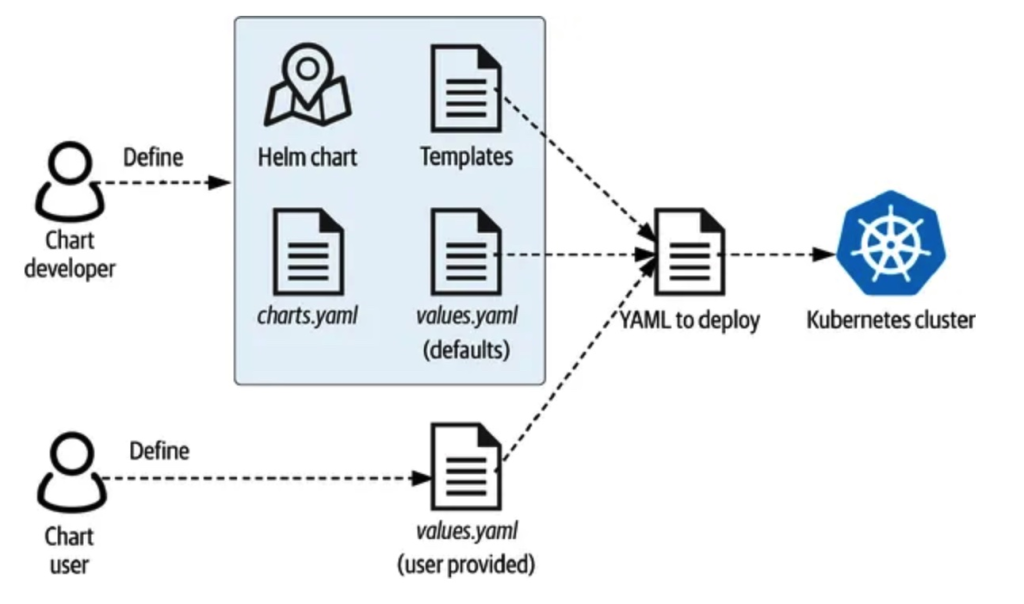
- chart:chart就是helm package,包含了一个k8s app应用运行起来的所有要素,比如service, deployment, configmap, serviceaccount, rbac, 等,这些要素都是以template文件的形式存在,再结合values文件,最终渲染出能够被k8s执行的yaml文件;
- repository:仓库是charts的集合,方便进行分享和分发。下面是官网仓库和阿里云仓库的地址,大家可以进去看看,感受一下;
- https://artifacthub.io/
- https://developer.aliyun.com/hub
- release:在 Kubernetes 集群上运行的 Chart 的一个实例。在同一个集群上,一个 Chart 可以安装很多次。每次安装都会创建一个新的 release。例如一个 MySQL Chart,如果想在服务器上运行两个数据库,就可以把这个 Chart 安装两次。每次安装都会生成自己的 Release,会有自己的 Release 名称。
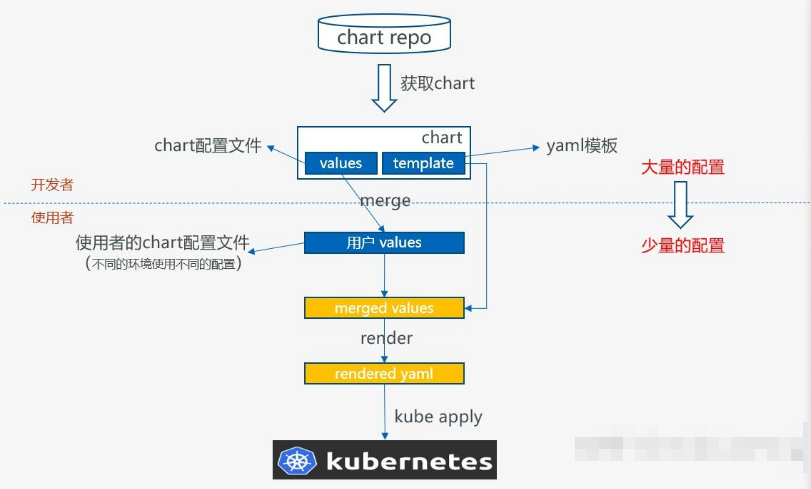
从上图可以看到,helm的核心运行流程分为以下几步:
- 从chart仓库中获取chart;
- 使用者配置自己的values文件,根据自己的运行环境对values进行修改;
- 默认values文件和使用者values文件会进行一个merge,形成最终的values文件;
- 使用最终的values文件,渲染chart的template,形成可以被kubernetes执行的yaml;
- 调用kube apply提交yaml到kubernetes
在这里,需要注意chart开发者和使用者的界限,正是由于在跨越这个界限的时候,从需要理解大量的配置到只需要理解少量的配置,使得ops的工作变得简便,这也是helm核心的设计哲学。
5、helm常用命令
在helm的时候,你可以使用第三方开发的chart,也可以自己开发chart,以下是两种情况下使用的常见命令。更为详细的命令,可以安装好helm之后,使用helm help来查看,或查看官方文档。
5.1、使用第三方开发的chart
部署前
- repo: add, list, remove, update, and index chart repositories
- search: search for a keyword in charts
部署后
- install: install a chart
- list: list releases
- status: display the status of the named release
- upgrade: upgrade a release
- rollback: roll back a release to a previous revision
- uninstall: uninstall a release
5.2、自己开发chart
- lint: examine a chart for possible issues
- package: package a chart directory into a chart archive
- push: push helm chart to chartmuseum
- chart push: push helm chart to OCI repository
6、使用例子
这里以制作一个简单服务应用chart包为例子介绍helm的基本用法。(这里跳过docker镜像制作过程)
6.1、创建chart包
通过helm create命令创建一个新的chart包。
# 在当前目录创建一个myapp chart包$ helm create myapp |
创建完成后,得到的目录结构如下:
myapp - chart 包目录名├── charts - 依赖的子包目录,里面可以包含多个依赖的chart包├── Chart.yaml - chart定义,可以定义chart的名字,版本号信息。├── templates - k8s配置模版目录, 我们编写的k8s配置都在这个目录, 除了NOTES.txt和下划线开头命名的文件,其他文件可以随意命名。│ ├── deployment.yaml│ ├── _helpers.tpl - 下划线开头的文件,helm视为公共库定义文件,主要用于定义通用的子模版、函数等,helm不会将这些公共库文件的渲染结果提交给k8s处理。│ ├── ingress.yaml│ ├── NOTES.txt - chart包的帮助信息文件,执行helm install命令安装成功后会输出这个文件的内容。│ └── service.yaml└── values.yaml - chart包的参数配置文件,模版可以引用这里参数。 |
我们要在k8s中部署一个服务应用,需要编写deployment、service、ingress三个配置文件,刚才通过helm create命令已经创建好了。
6.2、编写k8s应用部署配置文件
为了演示chart包模版的用法,我们先把deployment、service、ingress三个配置文件的内容清空,重新编写k8s部署文件。
**deployment.yaml **配置文件定义如下:
|
service.yaml 定义如下:
|
ingress.yaml 定义如下:
|
6.3、提取模板与参数
为什么要提取上面配置文件中的参数,作为chart包的参数?
思考:制作好一个chart包之后,如何实现chart包更具有通用性,我们如何换域名?换镜像地址?改一下应用部署的名字? 部署多套环境?(例如:dev环境、test环境分别以不同的应用名字部署一套)
因此通过提取配置中的参数,注入模版变量,模版表达式将配置文件转化为模版文件,helm在运行的时候根据参数动态的将模版文件渲染成最终的配置文件。
下面将deployment、service、ingress三个配置文件转换成模版文件。
deployment.yaml 配置模版如下:
|
service.yaml 定义如下:
|
ingress.yaml 定义如下:
|
values.yaml chart包参数定义:
|
6.4、通过helm命令安装/更新应用
安装应用
#命令格式: helm install chart包目录$ helm install ./myapp# 通过命令注入参数#命令格式: helm install --set key=value chart包目录#–set 参数可以指定多个参数,他的值会覆盖values.yaml定义的值,对象类型数据可以用 . (点)分割属性名,例子: --set apiAppResources.requests.cpu=1$ helm install \--set replicas=2 \--set host=www.xxxx.com \./myapp |
更新应用
#命令格式: helm upgrade release名字 chart包目录$ helm upgrade myapp ./myapp#也可以指定–set参数$ helm upgrade \--set replicas=2 \--set host=www.xxxx.com \myapp ./myapp#默认情况下,如果release名字不存在,upgrade会失败,可以加上-i 参数当release不存在的时候则安装,存在则更新,将install和uprade命令合并。$ helm upgrade -i \--set replicas=2 \--set host=www.xxxx.com \myapp ./myapp |
helm的安装与使用
安装可以参考官方文档 https://helm.sh/zh/docs/intro/install/,这里使用 gox 对helm源码进行编译安装:
| ➜ git clone https://github.com/helm/helm.git ➜ cd helm/cmd/helm # 这里使用的是mac,所以编译为 darwin/amd64。得到可执行文件 helm_darwin_amd64 ➜ gox -osarch=”darwin/amd64″ ./ ➜ mv helm_darwin_amd64 helm ➜ cp helm /usr/local/bin/ # 查看安装的helm的版本号 ➜ helm version version.BuildInfo{Version:”v3.15.2″, GitCommit:”1a500d5625419a524fdae4b33de351cc4f58ec35″, GitTreeState:”clean”, GoVersion:”go1.22.4″} |
使用 helm 创建 helm-demo chart 模板
| ➜ helm create helm-demo Creating helm-demo ➜ tree helm-demo helm-demo ├── Chart.yaml – chart定义,可以定义chart的名字,版本号信息。 ├── charts – 依赖的子包目录,里面可以包含多个依赖的chart包 ├── templates – k8s配置模版目录,除NOTES.txt和下划线开头命名的文件,其他可任意命名 │ ├── NOTES.txt – chart 包的帮助信息文件,执行helm install命令安装成功后会输出这个文件的内容 │ ├── _helpers.tpl – 下划线开头的文件被视为公共库定义文件,定义通用的子模版、函数等,不会将这些文件的渲染结果提交给k8s处理 │ ├── deployment.yaml │ ├── hpa.yaml │ ├── ingress.yaml │ ├── service.yaml │ ├── serviceaccount.yaml │ └── tests │ └── test-connection.yaml └── values.yaml – 包的参数配置文件,模版可引用这里参数 4 directories, 10 files |
以 模板 templates/service.yaml 文件为例
| apiVersion: v1 kind: Service metadata: name: {{ include “helm-demo.fullname” . }} labels: {{- include “helm-demo.labels” . | nindent 4 }} spec: type: {{ .Values.service.type }} ports: – port: {{ .Values.service.port }} targetPort: http protocol: TCP name: http selector: {{- include “helm-demo.selectorLabels” . | nindent 4 }} |
可以看到被 {{}} 包裹的都是在渲染时需要填充的数据,其中 include 意味着此处嵌入其他模板,其他的则为 渲染时填充的字段值,.Values 开头的值在 values.yaml 文件中。例如.Values.service.port为values.yaml文件中 service下port 的值,其他的类似(当然用法跟 go 的 text/template package的用法一样)。
| #===== values.yaml文件 # Default values for helm-demo. # This is a YAML-formatted file. # Declare variables to be passed into your templates. replicaCount: 1 image: repository: nginx pullPolicy: IfNotPresent # Overrides the image tag whose default is the chart appVersion. tag: “” imagePullSecrets: [] nameOverride: “” fullnameOverride: “” serviceAccount: # Specifies whether a service account should be created create: true # Automatically mount a ServiceAccount’s API credentials? automount: true # Annotations to add to the service account annotations: {} # The name of the service account to use. # If not set and create is true, a name is generated using the fullname template name: “” podAnnotations: {} podLabels: {} podSecurityContext: {} # fsGroup: 2000 securityContext: {} # capabilities: # drop: # – ALL # readOnlyRootFilesystem: true # runAsNonRoot: true # runAsUser: 1000 service: type: ClusterIP port: 80 ingress: enabled: false className: “” annotations: {} # kubernetes.io/ingress.class: nginx # kubernetes.io/tls-acme: “true” hosts: – host: chart-example.local paths: – path: / pathType: ImplementationSpecific tls: [] # – secretName: chart-example-tls # hosts: # – chart-example.local resources: {} # We usually recommend not to specify default resources and to leave this as a conscious # choice for the user. This also increases chances charts run on environments with little # resources, such as Minikube. If you do want to specify resources, uncomment the following # lines, adjust them as necessary, and remove the curly braces after ‘resources:’. # limits: # cpu: 100m # memory: 128Mi # requests: # cpu: 100m # memory: 128Mi livenessProbe: httpGet: path: / port: http readinessProbe: httpGet: path: / port: http autoscaling: enabled: false minReplicas: 1 maxReplicas: 100 targetCPUUtilizationPercentage: 80 # targetMemoryUtilizationPercentage: 80 # Additional volumes on the output Deployment definition. volumes: [] # – name: foo # secret: # secretName: mysecret # optional: false # Additional volumeMounts on the output Deployment definition. volumeMounts: [] # – name: foo # mountPath: “/etc/foo” # readOnly: true nodeSelector: {} tolerations: [] affinity: {} |
在helm-demo chart各个文件中,所引用或使用的顶层变量大致为:
| example-helm/templates/tests/test-connection.yaml -> [Chart] [Files] [Release] [Capabilities] [Values] [Subcharts] [Template] example-helm/templates/serviceaccount.yaml -> [Chart] [Files] [Release] [Capabilities] [Values] [Subcharts] [Template] example-helm/templates/service.yaml -> [Files] [Release] [Capabilities] [Values] [Subcharts] [Template] [Chart] example-helm/templates/ingress.yaml -> [Template] [Chart] [Files] [Release] [Capabilities] [Values] [Subcharts] example-helm/templates/hpa.yaml -> [Values] [Subcharts] [Template] [Chart] [Files] [Release] [Capabilities] example-helm/templates/deployment.yaml -> [Files] [Release] [Capabilities] [Values] [Subcharts] [Template] [Chart] example-helm/templates/NOTES.txt -> [Chart] [Files] [Release] [Capabilities] [Values] [Subcharts] [Template] |
Helm install命令执行流程
helm的大部分子命令执行逻辑相似,这里以 helm 的子命令install为例,简单追溯其执行过程。
| cmd/helm/install.go newInstallCmd() runInstall() vals, err := valueOpts.MergeValues(p) // 获取helm模板需要的参数信息 RunWithContext() i.cfg.KubeClient.IsReachable() // 检查是否能够连接到k8s集群 i.cfg.renderResources() // 渲染helm的模板文件 e.Render() e.render() // 开始渲染 t := template.New(“gotpl”) // 使用 go语言 text/template 渲染模板 t.ExecuteTemplate() i.cfg.KubeClient.Build() // 把渲染得到的yaml文件构建成k8s所需的资源格式 i.cfg.KubeClient.Create() // 调用k8s服务创建资源 |
可以看出,在执行install的过程中会检查k8s集群是否可用,这也是使用前注意事项的先决条件中要求一个Kubernetes集群的原因。
假设没有可用k8s集群,则在执行helm指令时可能会报错,如下所示:
| ➜ helm install demo ./helm-demo –debug –dry-run install.go:222: [debug] Original chart version: “” install.go:239: [debug] CHART PATH: /Users/xxxxxx/code/k8s/helm-demo Error: INSTALLATION FAILED: Kubernetes cluster unreachable: Get “https://127.0.0.1:26443/version”: dial tcp 127.0.0.1:26443: connect: connection refused helm.go:84: [debug] Get “https://127.0.0.1:26443/version”: dial tcp 127.0.0.1:26443: connect: connection refused Kubernetes cluster unreachable helm.sh/helm/v3/pkg/kube.(*Client).IsReachable helm.sh/helm/v3/pkg/kube/client.go:135 helm.sh/helm/v3/pkg/action.(*Install).RunWithContext helm.sh/helm/v3/pkg/action/install.go:231 main.runInstall helm.sh/helm/v3/cmd/helm/install.go:314 main.newInstallCmd.func2 helm.sh/helm/v3/cmd/helm/install.go:156 github.com/spf13/cobra.(*Command).execute github.com/spf13/cobra@v1.8.0/command.go:983 github.com/spf13/cobra.(*Command).ExecuteC github.com/spf13/cobra@v1.8.0/command.go:1115 github.com/spf13/cobra.(*Command).Execute github.com/spf13/cobra@v1.8.0/command.go:1039 main.main helm.sh/helm/v3/cmd/helm/helm.go:83 runtime.main runtime/proc.go:271 runtime.goexit runtime/asm_amd64.s:1695 INSTALLATION FAILED main.newInstallCmd.func2 helm.sh/helm/v3/cmd/helm/install.go:158 github.com/spf13/cobra.(*Command).execute github.com/spf13/cobra@v1.8.0/command.go:983 github.com/spf13/cobra.(*Command).ExecuteC github.com/spf13/cobra@v1.8.0/command.go:1115 github.com/spf13/cobra.(*Command).Execute github.com/spf13/cobra@v1.8.0/command.go:1039 main.main helm.sh/helm/v3/cmd/helm/helm.go:83 runtime.main runtime/proc.go:271 runtime.goexit runtime/asm_amd64.s:1695 |
调试模式下渲染模板
helm命令加上–debug –dry-run 两个参数,只输出模版渲染结果,不交给k8s处理。
| ➜ k8s helm install demo ./helm-demo –debug –dry-run install.go:222: [debug] Original chart version: “” install.go:239: [debug] CHART PATH: /Users/ivanli/code/k8s/helm-demo #=== chart信息,STATUS为执行install后当前chart的状态 ===# NAME: demo LAST DEPLOYED: Mon Jul 8 11:40:27 2024 NAMESPACE: default STATUS: pending-install REVISION: 1 USER-SUPPLIED VALUES: {} #=== 渲染模板时使用的数据 ===# COMPUTED VALUES: affinity: {} autoscaling: enabled: false maxReplicas: 100 minReplicas: 1 targetCPUUtilizationPercentage: 80 fullnameOverride: “” image: pullPolicy: IfNotPresent repository: nginx tag: “” imagePullSecrets: [] ingress: annotations: {} className: “” enabled: false hosts: – host: chart-example.local paths: – path: / pathType: ImplementationSpecific tls: [] livenessProbe: httpGet: path: / port: http nameOverride: “” nodeSelector: {} podAnnotations: {} podLabels: {} podSecurityContext: {} readinessProbe: httpGet: path: / port: http replicaCount: 1 resources: {} securityContext: {} service: port: 80 type: ClusterIP serviceAccount: annotations: {} automount: true create: true name: “” tolerations: [] volumeMounts: [] volumes: [] HOOKS: — # Source: helm-demo/templates/tests/test-connection.yaml apiVersion: v1 kind: Pod metadata: name: “demo-helm-demo-test-connection” labels: helm.sh/chart: helm-demo-0.1.0 app.kubernetes.io/name: helm-demo app.kubernetes.io/instance: demo app.kubernetes.io/version: “1.16.0” app.kubernetes.io/managed-by: Helm annotations: “helm.sh/hook”: test spec: containers: – name: wget image: busybox command: [‘wget’] args: [‘demo-helm-demo:80’] restartPolicy: Never #=== 渲染后所有的清单 ===# MANIFEST: — # Source: helm-demo/templates/serviceaccount.yaml apiVersion: v1 kind: ServiceAccount metadata: name: demo-helm-demo labels: helm.sh/chart: helm-demo-0.1.0 app.kubernetes.io/name: helm-demo app.kubernetes.io/instance: demo app.kubernetes.io/version: “1.16.0” app.kubernetes.io/managed-by: Helm automountServiceAccountToken: true — # Source: helm-demo/templates/service.yaml apiVersion: v1 kind: Service metadata: name: demo-helm-demo labels: helm.sh/chart: helm-demo-0.1.0 app.kubernetes.io/name: helm-demo app.kubernetes.io/instance: demo app.kubernetes.io/version: “1.16.0” app.kubernetes.io/managed-by: Helm spec: type: ClusterIP ports: – port: 80 targetPort: http protocol: TCP name: http selector: app.kubernetes.io/name: helm-demo app.kubernetes.io/instance: demo — # Source: helm-demo/templates/deployment.yaml apiVersion: apps/v1 kind: Deployment metadata: name: demo-helm-demo labels: helm.sh/chart: helm-demo-0.1.0 app.kubernetes.io/name: helm-demo app.kubernetes.io/instance: demo app.kubernetes.io/version: “1.16.0” app.kubernetes.io/managed-by: Helm spec: replicas: 1 selector: matchLabels: app.kubernetes.io/name: helm-demo app.kubernetes.io/instance: demo template: metadata: labels: helm.sh/chart: helm-demo-0.1.0 app.kubernetes.io/name: helm-demo app.kubernetes.io/instance: demo app.kubernetes.io/version: “1.16.0” app.kubernetes.io/managed-by: Helm spec: serviceAccountName: demo-helm-demo securityContext: {} containers: – name: helm-demo securityContext: {} image: “nginx:1.16.0” imagePullPolicy: IfNotPresent ports: – name: http containerPort: 80 protocol: TCP livenessProbe: httpGet: path: / port: http readinessProbe: httpGet: path: / port: http resources: {} #=== template/NOTES.txt 文件内容 ===# NOTES: 1. Get the application URL by running these commands: export POD_NAME=$(kubectl get pods –namespace default -l “app.kubernetes.io/name=helm-demo,app.kubernetes.io/instance=demo” -o jsonpath=”{.items[0].metadata.name}”) export CONTAINER_PORT=$(kubectl get pod –namespace default $POD_NAME -o jsonpath=”{.spec.containers[0].ports[0].containerPort}”) echo “Visit http://127.0.0.1:8080 to use your application” kubectl –namespace default port-forward $POD_NAME 8080:$CONTAINER_PORT |
总之,helm简化对 k8s 的操作与管理,非常值得一试。