背景:微软提供了通过Remote Desktop Web修改域用户密码的方式;但在实际使用过程中,很多用户即便是收到了密码过期的邮件提醒,也经常会忽略邮件,等到密码过期的时候再来询问;而很多人即便是有操作文档指引,也会经常性的找上来。
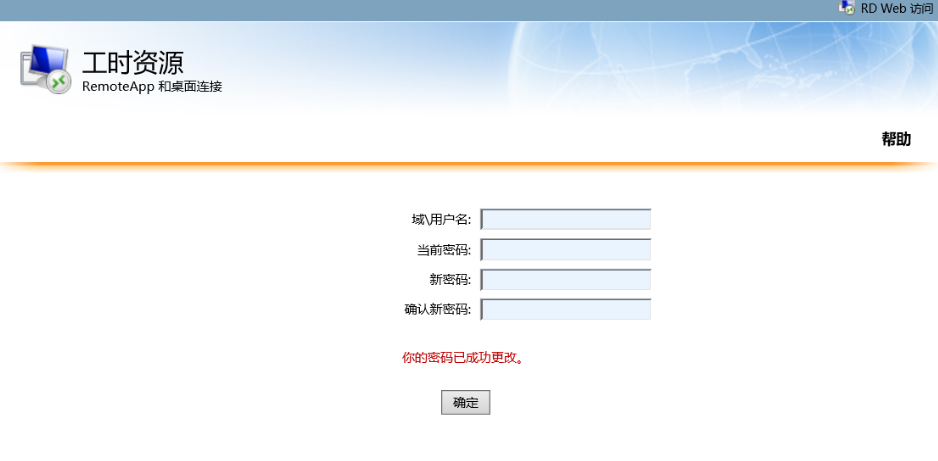
尤其是第一行输入域\用户名,经常会有人输入错误找上来,徒增工作量。
正常情况下,假如我们的域wooring.cn是需要修改,我们输入的是:域\用户名:wooring\test (需要输入反斜杠)
很多人都会输入成wooring.cn\test然后就提示错误了,而且Microsoft提供的页面也经常被吐槽丑陋,但是定制化开发吧,又排不上期。
刚好想起来,以前使用openLDAP的时候,用过Self-Password-Services来实现用户的自助改密,便自己搭建了一个,过程中发现了不少的坑,网上虽然也有很多类似的教程,但都比较不怎么全面,自己也是踩了不少的坑。
部署环境:Ubuntu 22.04 WIN SVR 2019 + AD
AD域的部署就不叙述了,需要注意的是,如果是想搭建测试环境,在添加服务器的时候,需要先新AD域,AD域部署完了以后,再部署CA服务器,证书导出后,还需要开启服务器证书安全政策。
导出证书部分也不重复了,网上资料齐全。
证书导出后,默认是cer格式的,需要转换为pem格式。
在Ubuntu机器上执行:openssl x509 -inform der -in woo-CA.cer -out ad.pem如果没有安装openssl的,自行安装。
具体部署过程:
wget -O - https://ltb-project.org/documentation/_static/ltb-project-debian-keyring.gpg | gpg --dearmor | sudo tee /usr/share/keyrings/ltb-project-debian-keyring.gpg >/dev/null

echo "deb [arch=amd64 signed-by=/usr/share/keyrings/ltb-project-debian-keyring.gpg] https://ltb-project.org/debian/stable stable main" | sudo tee /etc/apt/sources.list.d/ltb-project.list

apt update

apt install self-service-password

或者参考官方文档:https://self-service-password.readthedocs.io/en/latest/installation.html
部署后修改配置文件
cd /etc/self-service-password/config.inc.php$debug = true;
# LDAP
$ldap_url = "ldaps://AD的域名或者IP:636"; //微软AD必须使用ldaps
$ldap_starttls = true;
$ldap_binddn = "CN=具备管理员权限的账号,OU=Account,OU=Servers,DC=域,DC=COM";
putenv("LDAPTLS_CACERT=/etc/ldap/ad.pem"); //证书所在的位置,需要部署ldap
$ldap_bindpw = '密码';
// for GSSAPI authentication, comment out ldap_bind* and uncomment ldap_krb5ccname lines
//$ldap_krb5ccname = "/path/to/krb5cc";
$ldap_base = "DC=域=,DC=COM";
$ldap_login_attribute = "sAMAccountName"; //符合AD的方式
$ldap_fullname_attribute = "cn";
#$ldap_filter = "(&(objectClass=person)($ldap_login_attribute={login}))";
$ldap_filter = "(&(objectClass=user)(objectCategory=person)($ldap_login_attribute={login}))";
$ldap_scope = "sub"; # possible values: sub, one, base
$ldap_use_exop_passwd = false;
$ldap_use_ppolicy_control = false;
$ldap_network_timeout = 10;
$ldap_page_size = 0;
$ldap_password_attribute = "unicodePwd"; // AD专属密码属性
$ldap_tls_checkpeer = false;
$ldap_tls_checkhost = false;
$ldap_tls_require_cert = "never"; //开启
$ldap_starttls = false;
#$ladp_charset = "UTF-8"
//
# Active Directory mode
# true: use unicodePwd as password field
# false: LDAPv3 standard behavior
$ad_mode = true; //必须开启
$ad_options=[];
……
以下为密码复杂度要求等,根据自己需求修改
# Force account unlock when password is changed
$ad_options['force_unlock'] = true; //注意
# Force user change password at next login
$ad_options['force_pwd_change'] = false;
# Allow user with expired password to change password
$ad_options['change_expired_password'] = true; //注意
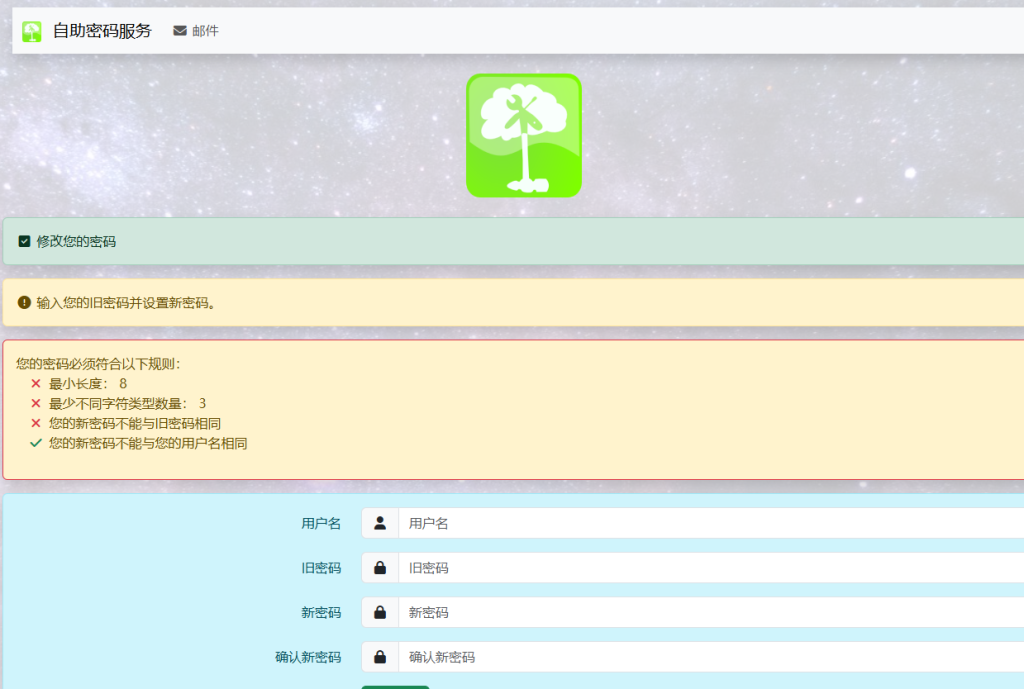
$pwd_min_length = 8;
# Maximal length
$pwd_max_length = 0;
# Minimal lower characters
$pwd_min_lower = 0;
# Minimal upper characters
$pwd_min_upper = 0;
# Minimal digit characters
$pwd_min_digit = 0;
# Minimal special characters
$pwd_min_special = 0;
# Definition of special characters
$pwd_special_chars = "^a-zA-Z0-9!@#$%&*()_\+\-=\[\]\{\}|;:,.<>?";
# Forbidden characters
#$pwd_forbidden_chars = "@%!^&*#$";
# Don't reuse the same password as currently
$pwd_no_reuse = true;
# Check that password is different than login
$pwd_diff_login = true;
# Check new passwords differs from old one - minimum characters count
$pwd_diff_last_min_chars = 0;
# Forbidden words which must not appear in the password
$pwd_forbidden_words = array();
# Forbidden ldap fields
# Respective values of the user's entry must not appear in the password
# example: $pwd_forbidden_ldap_fields = array('cn', 'givenName', 'sn', 'mail');
$pwd_forbidden_ldap_fields = array();
# Complexity: number of different class of character required
$pwd_complexity = 3;
# use pwnedpasswords api v2 to securely check if the password has been on a leak
$use_pwnedpasswords = false;
# show password entropy bar (require php zxcvbn module)
$pwd_display_entropy = false;
# enforce password entropy check
$pwd_check_entropy = false;
# minimum entropy level required (when $pwd_check_entropy enabled)
$pwd_min_entropy = 3;
# Show policy constraints message:
# always
# never
# onerror
$pwd_show_policy = "always"; //根据自己需求是否展示
# Position of password policy constraints message:
# above - the form
# below - the form
$pwd_show_policy_pos = "above";
# disallow use of the only special character as defined in `$pwd_special_chars` at the beginning and end
$pwd_no_special_at_ends = false;
# Who changes the password?
# Also applicable for question/answer save
# user: the user itself
# manager: the above binddn
$who_change_password = "manager"; //这里必须修改
……
# Reset URL (mandatory)
$reset_url = "http://域名或者IP/"; //这里需要指定,因为这是邮件发出的时候附带的前缀
……
邮箱不再叙述,根据自己使用的邮箱服务器及使用的端口协议等来填写,需要注意的是,如果使用465端口,tsl需要修改为ssl
……
$keyphrase = "随便输入的密码"; //必须修改
# Use attributes update page
$use_attributes = false;
#$attribute_mail = "mail";
#$attribute_phone = "mobile";
#$who_change_attributes = "manager";
# Display help messages
$show_help = true;
# Default language
$lang = "cn"; //网页文字
# List of authorized languages. If empty, all language are allowed.
# If not empty and the user's browser language setting is not in that list, language from $lang will be used.
$allowed_lang = array();
# Display menu on top
$show_menu = true;
# Logo
$logo = "images/ltb-logo.png"; //自行修改
此外,需要提前部署ldap
apt install slapd ldap-utils 然后修改ldap的配置文件。
vi /etc/ldap/ldap.conf
#
# LDAP Defaults
#

# See ldap.conf(5) for details
# This file should be world readable but not world writable.

#BASE dc=example,dc=com
#URI  ldap://ldap.example.com ldap://ldap-provider.example.com:666

#SIZELIMIT 12
#TIMELIMIT 15
#DEREF  never

# TLS certificates (needed for GnuTLS)
#TLS_CACERT  /etc/ssl/certs/ca-certificates.crt
TLS_CACERT /etc/ldap/ad.pem   //这里是上边复制过来并转换后的ad证书的所在位置,可以自行修改。
TLS_REQCERT allow
如问题、短信等找回方式不想开启,可以在配置文件中关闭
1、 安装ssp时提示有关php的版本问题
apt-get install php-fpm apache2 php php-ldap php-mcrypt
sudo apt-get install php-fpm apache2 php php-ldap -y
sudo apt-get install gcc make autoconf libc-dev pkg-config libmcrypt-dev php-dev -y
sudo pecl install mcrypt-1.0.6
echo “extension=mcrypt.so” | sudo tee /etc/php/8.1/mods-available/mcrypt.ini
sudo phpenmod -v 8.1 mcrypt
sudo systemctl restart php8.1-fpm apache2
2、PHP Fatal error: Uncaught –> Smarty: unable to write file /var/cache/self-service-password/templates_c/wrt6463f2007b7dc3_77173179 <– \n thrown in /usr/share/php/Smarty/sysplugins/smarty_internal_runtime_writefile.php on line 60
这是由于templates-c这个文件夹没有权限引起,权限改成777,问题解决。
chmod + 777 /文件路径
3、密码被LDAP服务器拒绝。
可能是因为设置的新密码没有符合AD本身的密码规则,但是符合了ssp本地的密码策略,导致页面本身没有密码格式报错,只提示密码被LDAP服务器拒绝,所以AD域的密码要求需要跟SSP的一致才行。
4、通过email找回密码,“口令无效”
通过email找回密码,点击重置密码链接后,提示“口令无效
查询 /etc/httpd/logs/ssp_error_log 日志文件 /var/lib/php/session 只有root控制权限
PHP Warning: session_start(): Failed to read session data: files (path: /var/lib/php/session) in /usr/share/self-service-password/pages/resetbytoken.php on line 66
修改/var/lib/php/session权限
chmod -R 777 /var/lib/php/session
5、如果一直验证失败,可以使用ladp验证是否可以读取,或者通过证书是否可以读取用户信息
ldapsearch -x -D “CN=test,OU=Account,OU=Servers,DC=WOORING,DC=CN” -w ‘ldap#123’ -H ldaps://1.1.1.2:636 -b “DC=WOORING,DC=CN”” “(sAMAccountName=woo)”
参考文档:
https://blog.csdn.net/qq461391728/article/details/115867721
https://www.yinghuohong.cn/phpjichu/16294.html
https://self-service-password.readthedocs.io/en/latest/upgrade.html